Using GPS with longer distance cycling
- What does a GPS do?
- What equipment and data do I need?
- What should I consider when choosing a GPS receiver?
- How reliable is GPS location information?
- How do I attach the GPS to my bike?
- What computer software do I need to use my GPS?
- What mapping data do I need to use my GPS?
- How do I create a GPS route to navigate with?
- What is it like navigating with a GPS on a bike?
- How accurate is a GPS for recording elevation?
What does a GPS do?
A GPS receiver will be able to identify its location with an accuracy of about 5-10m every second or so. This in itself is not particularly useful unless presented in the context of other information such as known waypoints or digital mapping data. A GPS should therefore allow you to do the following:
- Report your current location in National Grid Coordinates (as well as latitude/longitude and a number of other coordinate systems)
- Display your current/average/maximum speed
- Display your current elevation above sea level
- Display distance travelled since switching on/resetting
- Store, display and output a 'track' of your journey since switching on/resetting. Track data can include position, elevation and time.
If you supply one or more waypoints (user-defined locations) to the GPS, it can also do the following:
- Display distance and direction to a given waypoint
- Display estimated time of arrival at a given waypoint based on recent average speed
- String waypoints together to create a route. This effectively selects a new waypoint for you each time you pass the previous one in a sequence.
- Display total distance of a route and estimated time of arrival at the ultimate destination
If your GPS receiver is capable of storing and displaying mapping data (see What should I consider when choosing a GPS receiver?) it can also do the following:
- Display a simple map centred on your current location
- Overlay your route, previous track and waypoints onto the map
- Depending on the GPS model, calculate a route and provide navigation instructions to a given destination.
What equipment and data do I need?
 |
 |
 |
 |
- A GPS receiver
- A handlebar mount
- A computer
- A cable to attach GPS receiver to computer
- Some mapping data for computer from which to identify waypoint locations
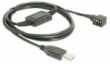
The absolute minimum would be just a GPS receiver. On its own, this can keep a record of your current location and calculate typical cycle-computer measures such as speed, distance covered, time travelling etc. However, to be of any practical use, you need to be able to connect the GPS to a computer in order to load and save data relevant to your route. Note that many GPS units do not include the computer connecting cable, so this may need to be purchased separately. It is still common for these cables to use the older 'RS232' connector rather than USB, so if you do not have an appropriate socket on your computer, you may need to buy a RS232 to USB converter cable.
What should I consider when choosing a GPS receiver?
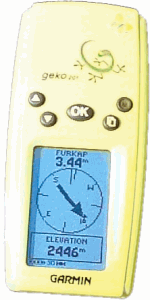
The two main providers of GPS receivers suitable for bicycles are Garmin and Magellan. Garmin products seem to be the more widely used by cyclists. These and other vendors also provide GPS receivers integrated with PDAs such as the IPAQ Mobile Messenger. However these currently have a battery life that is probably too short for most Audax riding and require further protection from the elements (e.g. by using an OtterBox).Battery life/type. Some GPS have rechargeable lithium-ion type batteries, others use standard AA or AAA batteries. I would recommend AA or AAA since it is easier to buy and carry spares with you. Battery life will vary according to model, but I would look for one with a quoted life of at least 8 hours. In practice battery life depends on a number of factors including satellite signal strength (when satellite coverage is poor in woodland or very mountainous areas, the receiver will use up more power) and temperature (rechargeable batteries seem to be particularly sensitive to cold mornings). Most Garmin receivers have a battery save mode which I would recommend using for cycling. In this mode, there is less frequent processing of the satellite signal and this can add a couple of hours to the battery life. Typically, I expect to get about 10 hours or so out of two AAA Duracell Ultra batteries in my Garmin Geko 201.
Size/weight. Many 'portable' GPS receivers are designed for in-car use or for hikers to keep in ruc-sacs, and as such can feel a bit bulky when mounted on a bike. The smallest and lightest of the Garmin range include the Forerunner and Edge series, and the Geko series all of which sit well on handlebars. Slightly bulkier, but still quite manageable on a bike are the eTrex series. In my experience, GPS larger than these become too bulky to be convenient.
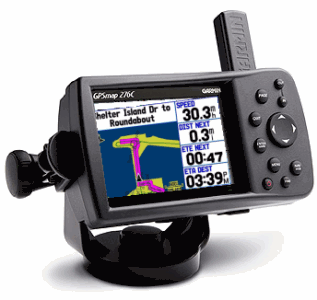
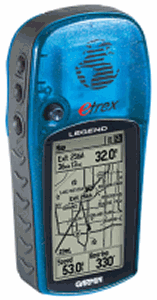
Mapping capabilities. There are 3 ways in which a GPS receiver can be used for navigation. All-in-one devices, such as the in-car tomtoms contain built in mapping, and software to perform the navigation. Give the device your destination and it will work out the route for you and display instructions as you navigate along it. The second category of GPS receivers such as the eTrex Legend allow mapping data to be uploaded into the device, but don't do the route finding for you. You have to supply a set of waypoints which are then displayed on the device with the mapping data provided for context. This can be useful if you go 'off route' as by reading the map display, you can work out how to get back to the next waypoint. The simplest category of GPS receivers, such as the Geko 201 contain no mapping data at all, but allow you to upload waypoints and display your current distance and direction from any chosen waypoint.
 |
 |
 |
| GPS with route planning, directions and mapping | GPS with background mapping | GPS with waypoints only |
My preference is for the simplest waypoints-only GPS units as they have benefits of size/weight, cost and battery life. Their main disadvantage is that they require software for getting waypoints into the device (see What computer software do I need to use my GPS? and How do I create a GPS route to navigate with? ).
Cost. Not suprisingly, the simpler units are cheaper to buy. The Garmin Geko 201 (photo above-right) sells for about £100. Basic mapping-capable devices such as the eTrex Legend (photo above centre), sell from about £130 upwards. Expect to pay extra for colour screen and greater memory for storing more mapping data. Garmin have just released a range of cycling-specific devices - the Edge 205/305 - that can include cadence, heart-rate and other cycling-specific additions. The cost is roughly £200 and £250 depending on extras required. Unlike most other packages, this price does include a bicycle mount and USB cable though. It's main disadvantage is the lithium-ion battery requiring recharging after about 10 hours use. I have checked with Garmin, and the battery is not removable or replaceable with a second unit. This is a great shame as it severely limits its use for longer rides.
Screen display. The size and quality of display can be important if you have problems reading small print. In-car and marine GPS units tend to have larger colour displays that are easy to read, but the devices themselves are likely to be too bulky and battery hungry to be practical. Smaller devices that display map data can be tricky to read on the move and the text displayed is often quite small. The non-map displays, such as the compass screen shown above right are generally quite clear to read on all devices, although the peripheral text is often smaller than the main display. Devices with reasonable battery life tend not to be back-lit in normal operation so are not visible in the dark. Most will allow you to temporarily illuminate the screen, but this can sap batteries quite quickly. For long night riding, I would recommend either positioning the GPS close to a front light that has some side illumination, or to have a small additional light that can be directed on the display (e.g. head torch).
How reliable is GPS location information?
The GPS receiver identifies your location by measuring the time taken to receive signals from at least three satellites. In order to measure elevation, it needs at least 4 satellite signals. The more satellite signals the device can find, the greater the quality of the locational information. If the path to the satellites is not obscured by trees or hills, the accuracy of location is around 5-8m. Absolute elevation accuracy can be less, especially if the signal to the 4th satellite is patchy, although relative change in elevation is generally pretty good. Some devices include barometric altimeters that can improve elevation accuracy, but note that these will use up batteries more quickly.
On a most rides, you should get pretty much uninterrupted coverage. In my experience, a 10 hour ride typically has around 5 minutes in total when I can't get a signal. The most likely cause of problems will be dense overhanging tree canopy in summer. Most GPS will not work indoors.
The most likely cause of failure of a GPS is batteries running out. I always carry some spare batteries and unless I have new ones at the start of the day, I would expect to change them once on a 200k ride. As far as I am aware, all devices will keep their data when changing batteries.
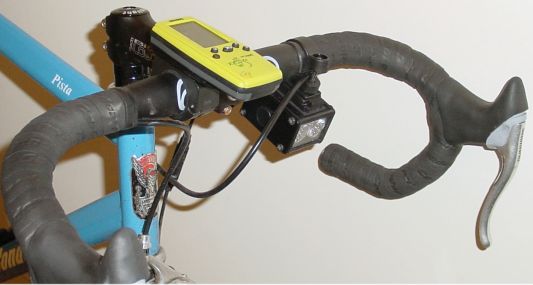
How do I attach the GPS to my bike?
You can keep the device in jersey pocket, bar bag etc. and get it out when needed, but I personally find this quite inconvenient. Having it attached to the handlebars as you would a cycle computer allows you to glance at speed, distance and direction at any point without the risk of dropping it. It also improves the ability of the GPS to receive satellite signals and for compass type display, will always be pointing in the direction of travel.
Most of the Garmin handheld GPS have a single recessed screwthreaded hole that allows brackets to be attached. The Garmin handlebar mounting kit consists of a bracket to attach to the bike and a plate to attach to the GPS. This allows a quick release of the GPS and with multiple brackets, can be used to swap GPS conveniently between bikes. Note that the standard mounting kit sold by Garmin is for normal diameter handlebars. It is possible to purchase a separate larger bracket for oversized bars (see photo below), but this needs to be purchased in addition to the standard kit as it does not include the mounting plate.
In 3 years of use, I have the found the bracket sturdy and reliable. While the fit of the plate onto the bracket is secure, it can rattle slightly which can be annoying on long rides. I have solved this by inserting a tiny sliver of cardboard in the plate's runners.
 |
 |
What computer software do I need to use my GPS?
GPS are most useful when combined with mapping data of some kind. This does not have to be maps stored on the receiver itself, but can be on a computer that is then used to transfer route information to the GPS. In order to do this you will need (i) a software package that can manipulate digital maps and communicate with your GPS and (ii) digital maps covering the area you wish to cycle. Data are often sold along with the software, but it is also possible to purchase/download maps separately from the software required to manipulate them.
Commonly used commercial GPS/mapping packages in the UK, which include options to purchase Ordnance Survey digital mapping include:
There are also a number of freely available packages for mapping and GPS communication that may be worth considering. These do not come with Ordnance Survey mapping data, but can be integrated with them if you have access to the data:
- LandSerf. This is written by me, and can be used for displaying maps, calculating elevation profiles and transferring routes and waypoints to/from the GPS. It does not include any OS digital mapping but can import maps if you have access to them. Unlike most of the other products this will also work with MacOSX and Linux as well as Windows.
- GPS Utility. A limited free version is available with extra functionality available for small payment. The emphasis is on GPS data manipulation.
- Easy GPS. Designed for GPS file transfer more than mapping, but contains some useful utilities for format conversion and GPS communication.
- GPS Babel. An opensource package specifically designed to convert between different GPS and route formats. A little awkward to use, but some very useful conversion routines if you are having trouble getting data from one format to another.
- Google maps/local/earth. Can be a useful tool for planning routes and with various user enhancements, can be used to create GPS compatible waypoint and route files.
- gmap Pedometer. Allows you to digitize a route over google maps and save the route as a GPX file that can be uploaded into a GPS receiver.
What mapping data do I need to use my GPS?
If you are just going to use a GPS for recording your location, speed and distance, then there is no need for any mapping data. If you have a GPS with background mapping capabilities, then it is likely to have been supplied with some simplified mapping for display.
If you need to enter the grid references of waypoints you will need some georeferenced map data on the computer. With appropriate software (see What computer software do I need to use my GPS?) you simply click on the locations on the map you wish to log as waypoints and these can be transferred to the GPS for navigation.
When placing waypoints, my preferred map data are Ordnance Survey Landranger 1:50,000 scale raster maps. This is sufficiently detailed to allow all relevant road junctions and contours to be displayed, but not too large scale to make plotting a long route cumbersome. Most commercial mapping packages (see What computer software do I need to use my GPS?) allow you to purchase 1:50k OS data for regions of Britain. It is also possible to extract waypoint coordinates for free, albeit tediously, from OS mapping on the web such as Streetmap and Ordnance Survey's get-a-map.
A recent innovation is the Google mapping services and API that allow users to provide their own customised services that use web mapping. It is technically possible to create a web page that allows users to pan around maps, clicking on the points they wish to log as waypoints, and then save the resulting route ready for transfer to a GPS. Watch this space for more details.
How do I create a GPS route to navigate with?
To create a route for your GPS, you will need some mapping software that allows you to select the waypoints you wish to be stored in the GPS by clicking map locations with a mouse.
Mapping © crown copyright/database right 2006. An Ordnance Survey/EDINA supplied service |
A route in GPS terms is simply a connected series of waypoints that you follow in sequence. The joining of these
waypoints together with straight lines need not follow a road exactly, but it should reflect most of the important junctions
and turnings.
The key to creating useful GPS routes is to select waypoints at the right places to reassure you that you are still on track when cycling on the road. Obvious perhaps, but after doing this for a few years now, and refining the way I select waypoints, I would consider the following when creating waypoints:
|
||||||||||||||||||||||||||||||||||||
Mapping © crown copyright/database right 2006. An Ordnance Survey/EDINA supplied service |
|
||||||||||||||||||||||||||||||||||||
|
|
What is it like navigating with a GPS on a bike?
Depending on the GPS receiver, and the data you have uploaded into it, there are two broad ways in which you can navigate. The first is to have the receiver display a map of your surroundings centred on your current location. This might be also be combined with a display of your recent progress and directions to your destination. The second more minimal approach is to set the GPS receiver to display the distance and direction to the next waypoint possibly combined with a simple map representation of the path you need to follow to get there.
My preference is for the simpler, waypoint approach, largely on the grounds of greater screen clarity when riding. Most GPS receivers that are practically mountable on a bike have pretty small screens. Trying to view complex mapping data while travelling at 30km/h on such screens can be quite hard, especially if you have any problems reading small print.
Navigating to waypoints using 'Compass' displays
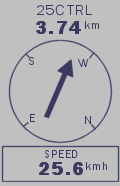 |
Most of the portable Garmin GPS receivers have a 'compass' screen that points in the direction of the next waypoint on a route. This
provides an immediate visual indication of the direction and distance to the waypoint. If you create waypoints as outlined in
How do I create GPS routes to navigate with?, this arrow should normally be pointing approximately forwards. If it
points hard left, right or behind you it is usually an indication that you have gone off track. A quick glance at the 'distance to
waypoint' figure is useful in telling you whether or not you have to think about navigation (if it is 5km to the next waypoint, there is no need
to worry about looking for that left turn for a while).
As you approach a waypoint with a turning, most GPS will give you some warning (sometimes audible). The compass arrow should also begin to turn to the next waypoint in sequence, giving you further indication of what to do at a junction. Some GPS users prefer to place waypoints 50m or so in advance of a turning in order to provide some extra warning. Personally, I find this can confusing, especially if you end up off route by mistake, or intentionally reverse the route. With suitable naming of waypoints (see How do I create GPS routes to navigate with?), you should get plenty of advanced warning of what to do at a junction. |
All GPS should be able to provide you with your average moving speed and overall average speed. If you are following a route uploaded into your GPS, you should be able to get the receiver to provide additional information such as distance to final destination and time of arrival at the next waypoint or final destination (based on recent average speed). These can all be helpful, especially if you are taking part in a timed event.
Navigating at night with a GPS can be more of a challenge, since most receivers that have a decent battery life will not be backlit by default. If I know I will have a substantial period of night navigation, I tend to carry a small head torch mounted on my helmet so I can read the display. This is probably more battery efficient than keeping the GPS backlight on permanently. Alternatively, some handlebar mounted lights may have some 'side spillage', that if mounted appropriately, can be enough to illuminate the GPS screen.
Finally, as a precaution, I would never rely entirely on a GPS for navigation. Should you run out of batteries unexpectedly, or damage the receiver after a crash, you still need some way of navigation. Keeping a paper copy of route instructions and/or a printout of a map with the route is a reassuring backup should things go wrong.
How accurate is a GPS for recording elevation?
GPS receivers can estimate their elevation above sea level in much the same way as they estimate location. The only difference is that at least 4 satellite signals are required for elevation, but only 3 are required for 2d position. Some devices also include a barometric altimeter which can be calibrated either against user-entered elevations (e.g. at sea level or by a spot height location on a map), or automatically against the GPS elevation estimation. When suitably calibrated, the altimeter is likely to give slightly more reliable results, but at the cost of extra battery consumption.
The graph below shows two elevation profiles for the 210km Clwydian Audax in March 2005. The orange line shows the elevation measured directly from Ordnance Survey's Digital Elevation Model (1m vertical precision, 50m horizontal precision). For the purposes of most rides, this is as accurate a profile as is likely to be required. The blue line shows the measured elevation from a Geko 201 (GPS only, no barometric readings). Overall, the relative elevation accuracy of the GPS is good (errors less than 5% of true elevation), but occasional poor GPS reception can result in 'spikes' of incorrectly calculated height - 3 can be seen in the graph below at 110km, 140km and 160km. It is likely that automatic barometric altitude would remove these spikes, but is unlikely to improve accuracy elsewhere by a significant margin. (Note in the profile below, the section at about 150km was ridden along a sea front promenade. The difference in height between the GPS and DEM height (about 5m) was due to the elevation model recording height as sea level and the GPS recording the height of the cycle track along the promenade.
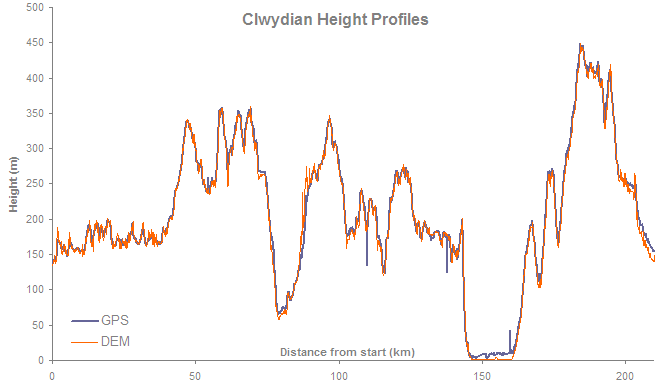
An important consideration when using any measurement of height gained on a cycle route (e.g. for the calculation of Audax AA points), is the frequency with which elevation values are sampled. This is likely to have far greater impact on the figure of total height climbed than elevation errors produced by a GPS. If elevations are measured with cm precision (as most GPS do) and recorded every 10m on the ground, overall measured height gained will be far greater than 'contour counting' the same route. The GPS will be measuring every minor rise and fall in the road whereas contour counting effectively smooths the profile out. For the Clwydian 210km shown above, contour counting suggested about 1950m of climbing, the DEM measured at 50m intervals suggested 2940m and the GPS measured at approximately 10m intervals suggested 3660m of total climbing. This discrepancy is not due to measurement error, but an ambiguously defined notion of what constitutes 'climbing'.